> For the complete documentation index, see [llms.txt](https://docs.lorric.com/qr/llms.txt). Markdown versions of documentation pages are available by appending `.md` to page URLs; this page is available as [Markdown](https://docs.lorric.com/qr/copy-of-fpas310-zhong-wen-v5/installation-and-setup/electronic-installation.md).
# 電機安裝
{% hint style="danger" %}
**安全第一:**請勿在通電狀態下配線,在進行任何配線動作前,請先關閉電源並將電源線移除 。
{% endhint %}
{% hint style="danger" %}
**嚴重警告:通訊線路嚴禁過電壓**\
Modbus RS-485 通訊線(A/B)之最高耐壓通常僅為 5V,絕不可與流量計的 DC 24V 電源線混接或導通。\
施工時若接線錯誤,高電壓將瞬間燒毀流量計內部核心元件。此類人為接線疏失引發的損壞不在保固範圍內。通電前請務必使用萬用表確認線路正確無誤。
{% endhint %}
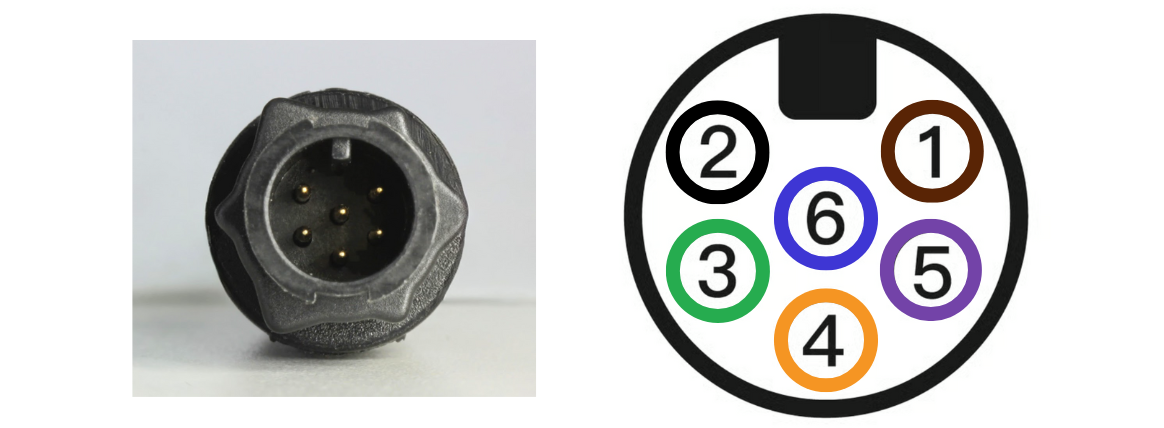
## 6pin 快速接頭接點定義
* 將主機隨附線材接上電源及需要的通訊連線。不使用的線頭請使用保護材避免主機漏電或短路。
* 進行任何打開主機及配線的動作前,請先關閉電源,並將電源線移除。
* 由於空間限制,**主機側面貼紙及後續圖示僅使用線材接點定義。**
6Pin 快速接頭線材顏色定義如下:
線材接點編號
| 編號 | 顏色 | 功能 |
| -- | -- | ----------- |
| 1 | 棕 | 24 VDC (+) |
| 2 | 黑 | RS485 (B-) |
| 3 | 綠 | RS485 (A+) |
| 4 | 橘 | NPN 輸出 (+) |
| 5 | 紫 | 4\~20mA (+) |
| 6 | 藍 | 0 VDC (-) |
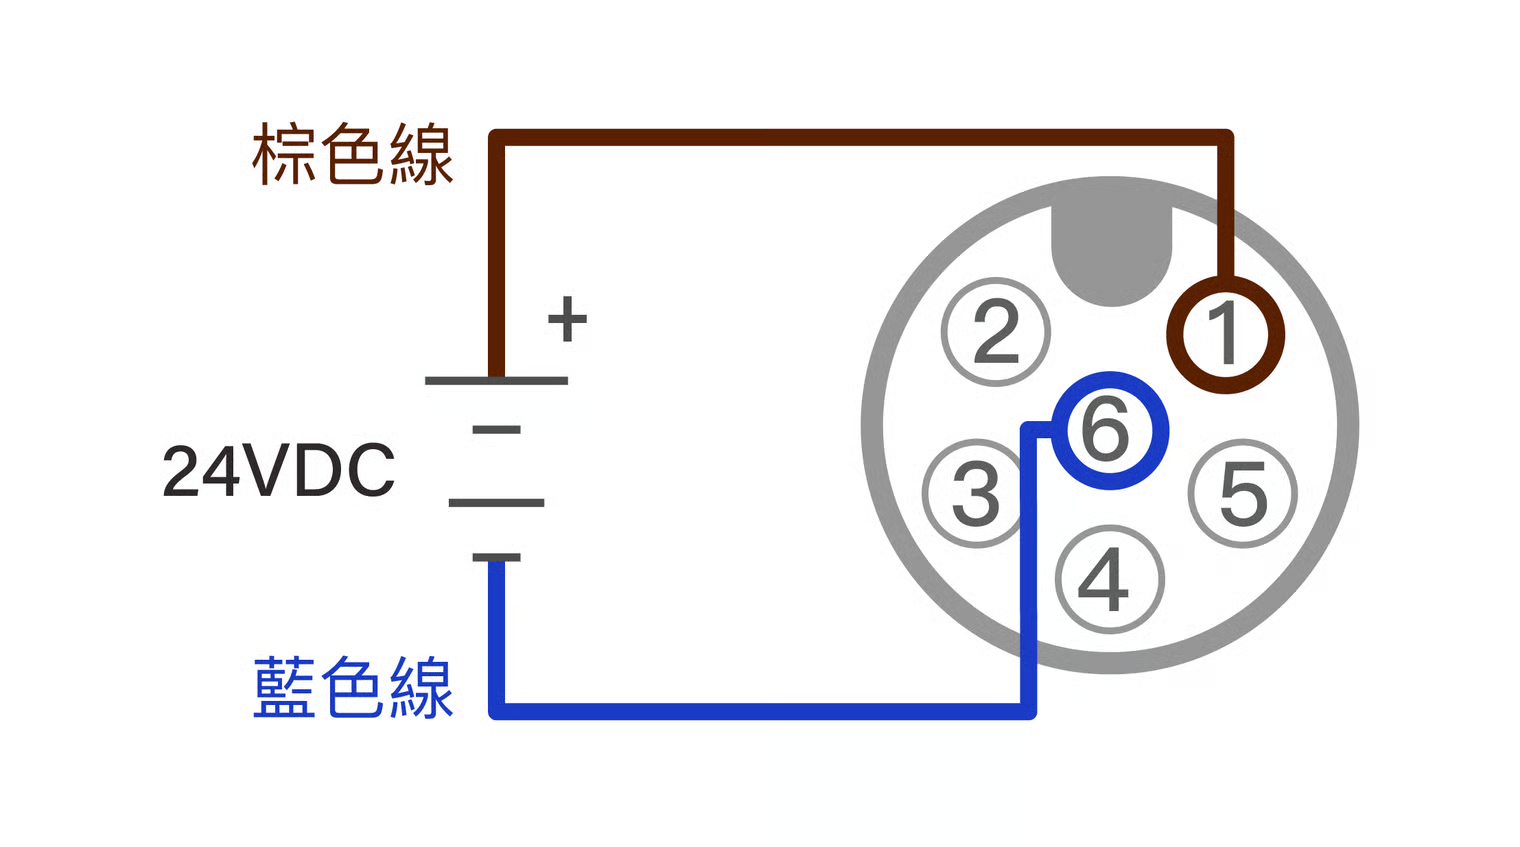
### 24V DC 電源配線圖
棕色線:24 VDC (+)、藍色線:0 VDC (-)
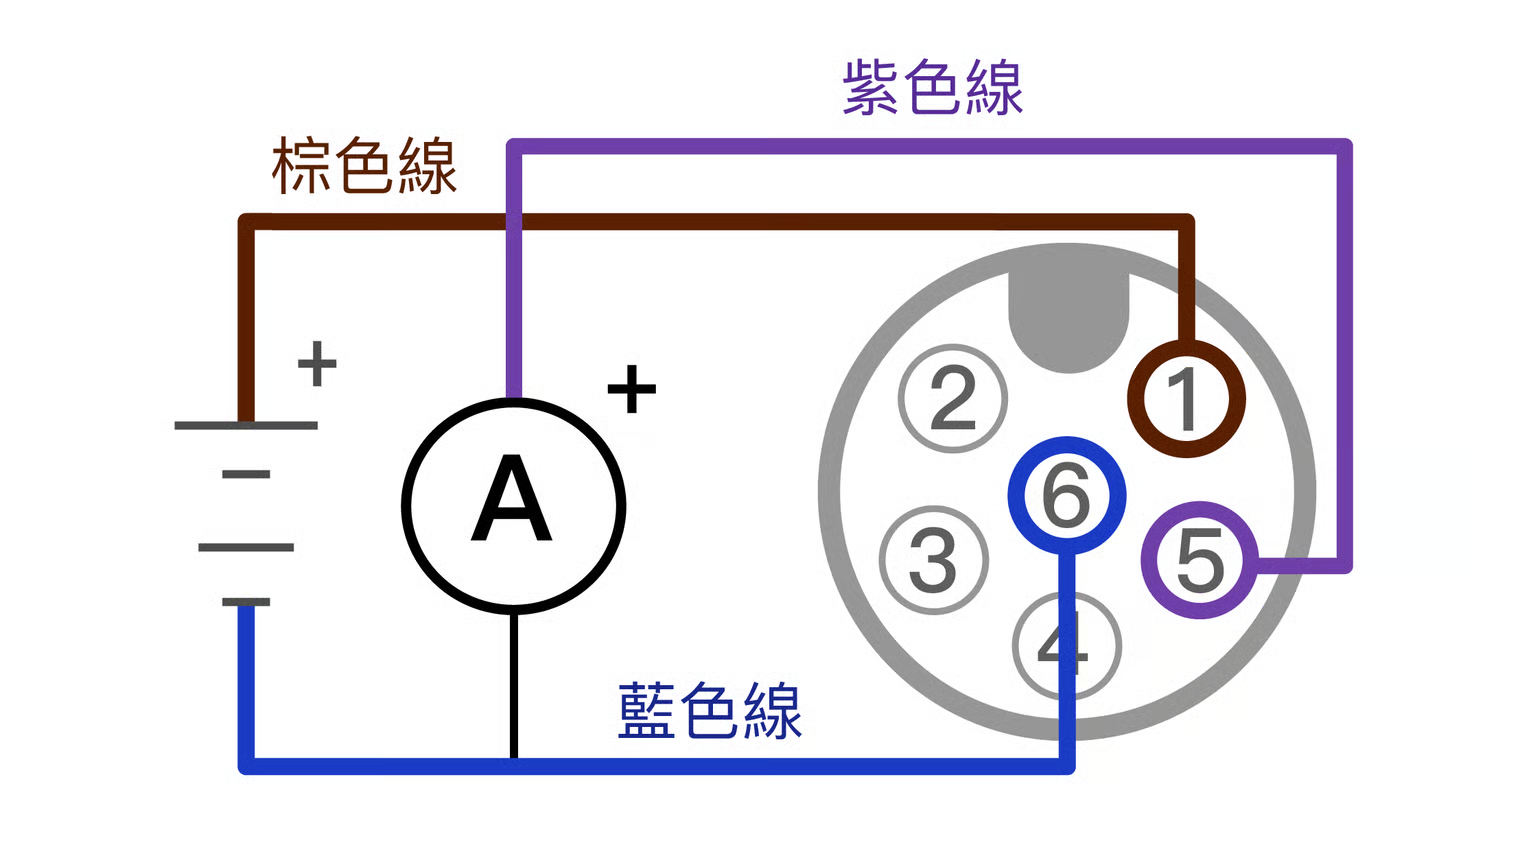
### 4-20mA 類比輸出配線圖
棕色線:24 VDC (+)、藍色線:0 VDC (-)、紫色線:4\~20mA (+)
本功能必需在DC 電源的棕色線和藍色線有供電的情形下,才能工作。
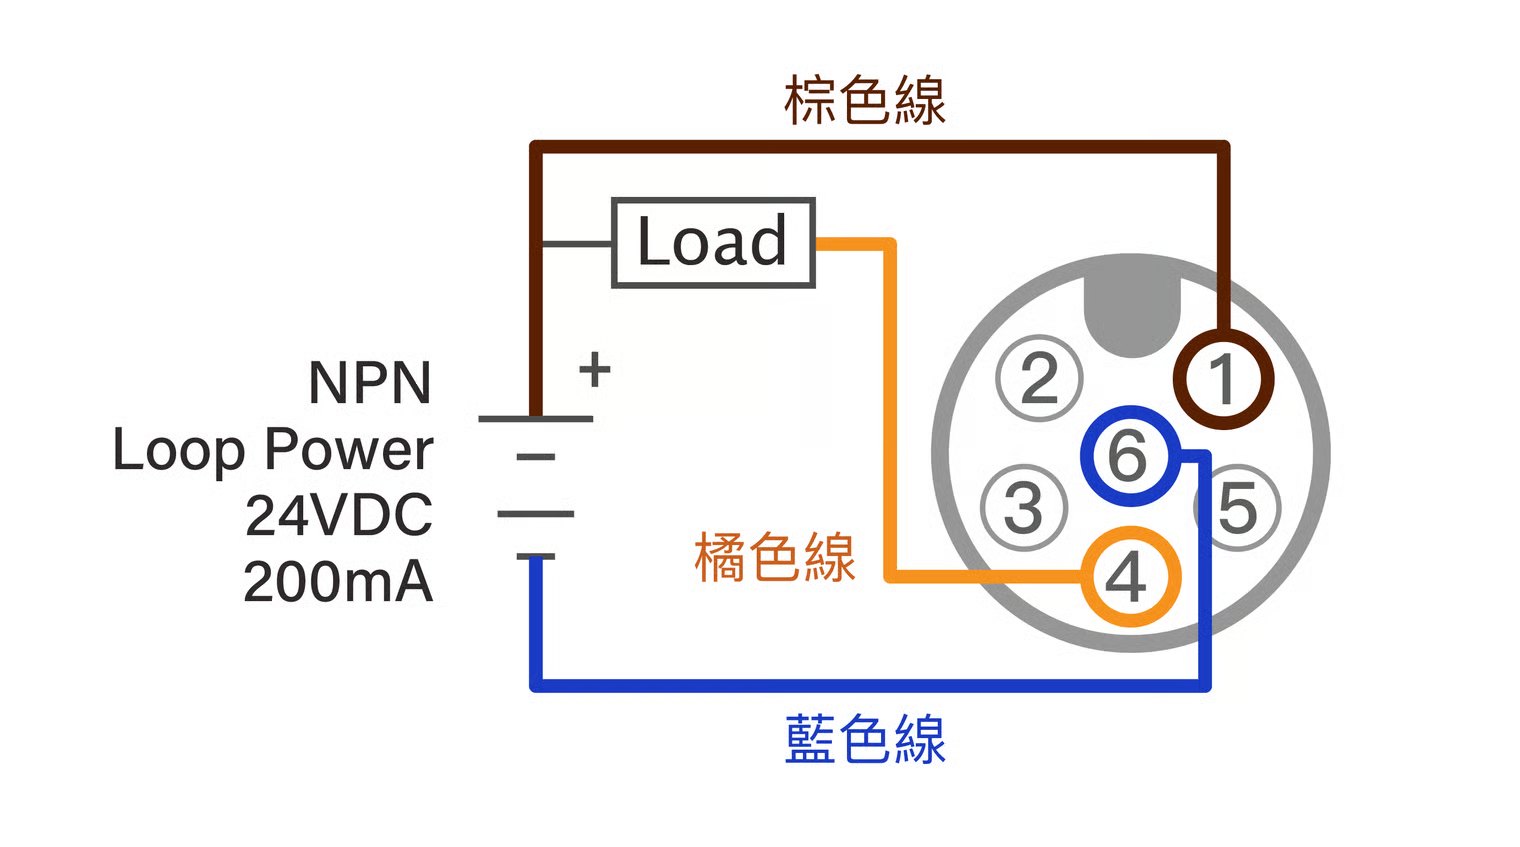
### NPN輸出配線圖
棕色線:24 VDC (+)、藍色線:0 VDC (-)、橘色線:NPN 輸出 (+)
本功能必需在DC 電源的棕藍色有供電的情形下,才能工作。為維持圖面易讀性,本圖省略DC供電圖,詳情形見DC 電源配線圖。
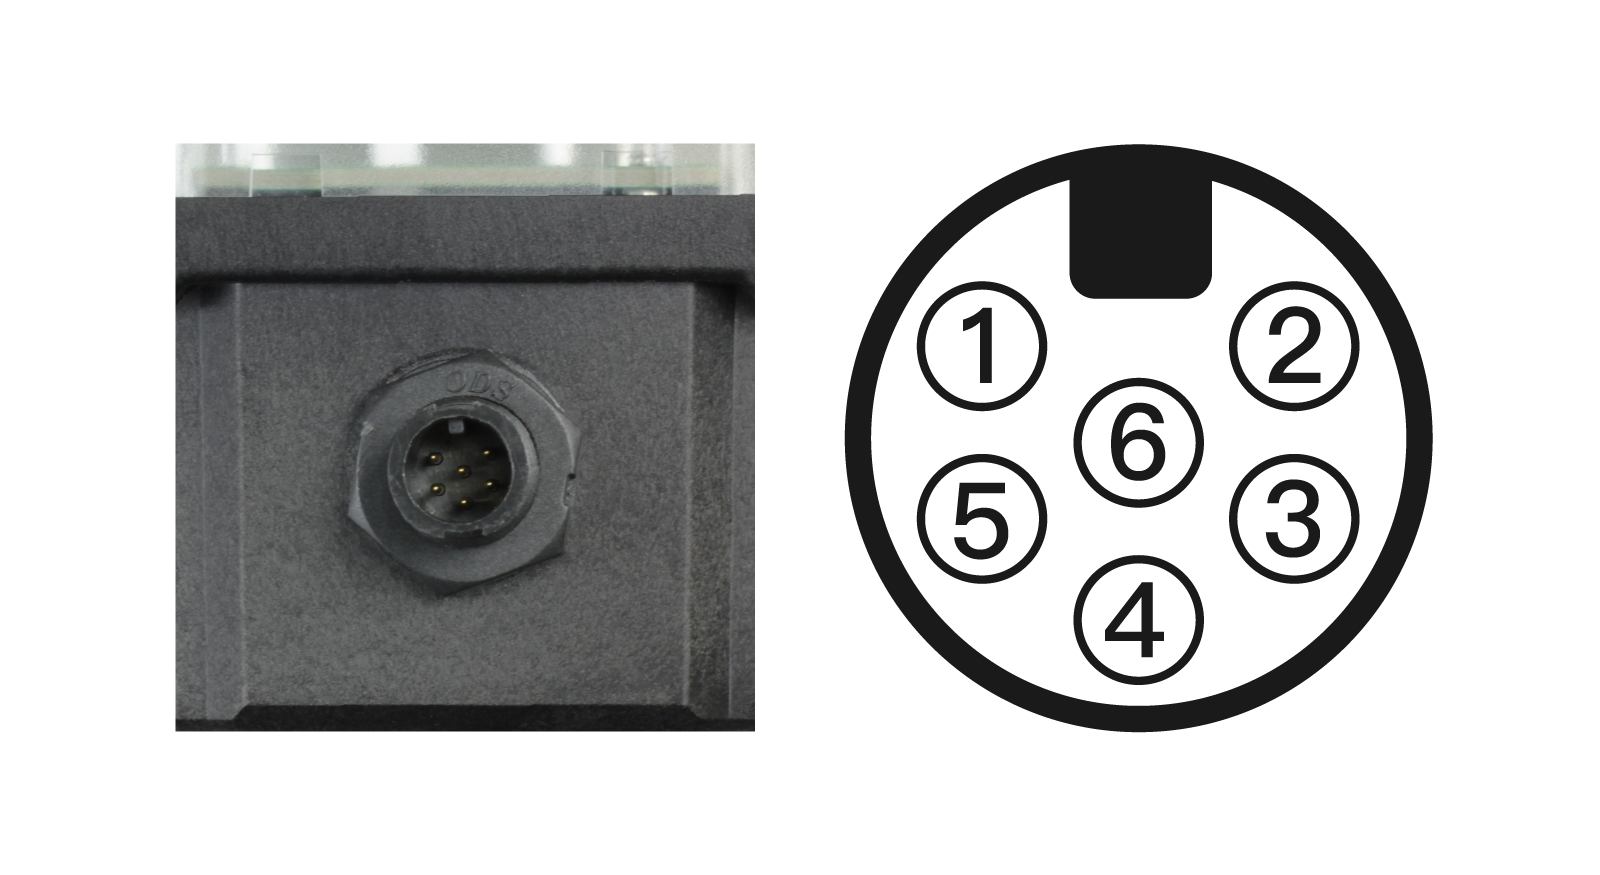
## 主機接點定義
1. 由於空間限制,**主機側面貼紙及後續圖示僅使用線材接點定義。**
2. 主機接點與線材接點編號為鏡像對稱。
3. 主機各接點編號如下:
---
# Agent Instructions
This documentation is published with GitBook. GitBook is the documentation platform designed so that both humans and AI agents can read, navigate, and reason over technical content effectively. Learn more at gitbook.com.
## Querying This Documentation
If you need additional information that is not directly available in this page, you can query the documentation by asking a question.
Perform an HTTP GET request on the following URL with the `ask` and `goal` query parameters:
```
GET https://docs.lorric.com/qr/copy-of-fpas310-zhong-wen-v5/installation-and-setup/electronic-installation.md?ask=&goal=
```
`ask` is the immediate question: it should be specific, self-contained, and written in natural language.
`goal` is what the user is ultimately trying to achieve, the reason they need the answer. Sharing it helps GitBook give you a better, more relevant answer. A goal is most helpful when it describes the outcome the user wants rather than restating the question. For example, with `ask=how do I create an API token`, a goal like `automate deployments from our CI pipeline` lets GitBook tailor the answer to that use case.
The response will contain a direct answer to the question and relevant excerpts and sources from the documentation.
Use this mechanism when the answer is not explicitly present in the current page, you need clarification or additional context, or you want to retrieve related documentation sections.